(28 intermediate revisions by the same user not shown)
Line 1:
Line 1:
GladiusRO features a collection of exclusively developed Custom NPCs designed to enhance convenience, progression, rewards, and the overall gameplay experience.
GladiusRO features a collection of exclusively developed Custom NPCs designed to enhance convenience, progression, rewards, and the overall gameplay experience. Each Custom NPC provides a unique service or feature, including access to special areas, server activities, investment systems, lotteries, VIP services, mining content, mission systems, reward redemption, and other custom functions. Use the sections below to learn where each NPC is located, how each system works, the requirements involved, and the rewards or services available.
Each Custom NPC provides a unique service or feature, including access to special areas, server activities, investment systems, lotteries, VIP services, mining content, mission systems, reward redemption, and other custom functions.
= '''Market Entrance Warper (NPC)''' =
[[File:Market Entrance Warper.png|location: prt_in,135,31|frame]]The '''Market Entrance Warper''' provides quick access to the '''GladiusRO Market''', the main trading centre where players can buy and sell a wide variety of items.
Use the sections below to learn where each NPC is located, how each system works, the requirements involved, and the rewards or services available.
* Browse shops selling weapons, armour, accessories, and other equipment.
* Purchase pet eggs, pet accessories, taming items, and other pet-related supplies.
* Find consumables, materials, rare items, and miscellaneous goods.
* Open their own '''Vending Shop''' to sell items directly to other players.
= Market Entrance Warper (NPC) =
Players who wish to sell items may enter through the '''Market Entrance Warper''', choose a suitable vending location inside the market, and open a shop using the game’s vending system. Prices are determined by individual sellers, so buyers are encouraged to compare different shops before purchasing.
The '''Market Entrance Warper''' provides quick access to the GladiusRO Market, where players can browse available shops and purchase items from other players.
Whether purchasing new equipment, searching for pet supplies, selling valuable items, or looking for rare goods, the '''GladiusRO Market''' is the primary destination for player-to-player trading. Speak to the '''Market Entrance Warper''' to enter the market and start shopping or vending.
== NPC Location ==
== NPC Location ==
Line 22:
Line 27:
# Select '''Enter the Market'''.
# Select '''Enter the Market'''.
# The NPC will teleport your character directly to the Market.
# The NPC will teleport your character directly to the Market.
= '''GladiusRO Lottery (NPC)''' =
[[File:GladiusRO Lottery.png|thumb|location: prt_in,130,39]]The '''GladiusRO Lottery''' is a coin-bag lottery system where players can purchase tickets for a chance to win prizes contributed by participating players.
The '''GladiusRO Lottery''' is a coin-bag lottery system where players can purchase tickets for a chance to win prizes contributed by participating players.
== NPC Location ==
== NPC Location ==
Line 45:
Line 41:
* Players choose a lucky number from '''1 to 9,999'''.
* Players choose a lucky number from '''1 to 9,999'''.
* Winner will be automatic selected by system up to 5 number
* The automatic lottery draw takes place at '''21:00 server time (GMT+8)''' every day.
* The automatic lottery draw takes place at '''21:00 server time (GMT+8)''' every day.
Line 55:
Line 52:
# Speak to the NPC and select '''Buy Ticket'''.
# Speak to the NPC and select '''Buy Ticket'''.
# Choose the number of tickets to purchase.
# Choose the number of tickets to purchase.
# Select your preferred lucky number from '''1 to 9,999'''.
# Select your preferred lucky number from '''0001 to 9999'''.
# Complete the purchase using the required Coin Bags.
# Complete the purchase using the required Coin Bags.
# Return after the daily draw to check the result.
# Return after the daily draw to check the result.
Line 75:
Line 72:
* '''View Winner Prizes''' — View the available prizes.
* '''View Winner Prizes''' — View the available prizes.
* '''[GM] Manage Winner Prizes''' — Administrative option reserved for authorized Game Masters.
'''Important:''' Make sure to check the lottery result and claim any available prize after the daily draw.
= '''AutoAttack System (NPC)''' =
[[File:AutoAttack System.png|thumb|location: prontera,147,162]]The '''AutoAttack System NPC''' allows players to configure automated combat, item collection, recovery, skills, teleportation, and other supported farming settings. Normal players receive '''2 hours of AutoAttack access per day'''. The daily allowance resets automatically each calendar day. Players with an active '''GladiusRO VIP''' subscription receive unlimited AutoAttack access for as long as the VIP subscription remains active.
'''Important:''' Make sure to check the lottery result and claim any available prize after the daily draw.
== NPC Location ==
* '''NPC Name:''' AutoAttack System
* '''Map:''' Prontera (<code>prontera</code>)
* '''Coordinates:''' <code>147, 162</code>
* '''Service:''' AutoAttack activation and configuration
== Access Duration ==
=== Normal Players ===
Normal players receive:
* '''2 hours of AutoAttack access per day'''
* Remaining time is saved when AutoAttack is turned off
* Used time continues from the remaining daily allowance
* The allowance resets automatically on the next calendar day
* Unused time does not extend the following day
For example, if a player uses AutoAttack for 30 minutes, the account will have approximately 1 hour and 30 minutes remaining for that day.
=== GladiusRO VIP Players ===
Players with an active GladiusRO VIP subscription receive:
* Unlimited AutoAttack access
* Continuous access while VIP remains active
* No normal 2-hour daily limitation
* Access automatically returns to the normal daily limit when VIP expires
VIP access is available only while the GladiusRO VIP subscription is active.
== How to Use the AutoAttack System ==
# Visit the '''AutoAttack System NPC''' at <code>prontera, 147, 162</code>.
# Speak to the NPC.
# Open '''Configuration'''.
# Configure the preferred monsters, skills, items, recovery options, and other settings.
# Save the configuration to a profile if required.
# Leave Prontera and travel to an eligible hunting map.
# Open the AutoAttack System again using the supported command.
# Select '''Turn ON AutoAttack'''.
# Monitor the character and remaining AutoAttack time.
# Select '''Turn OFF AutoAttack''' when the session is complete.
Although the NPC is located in Prontera, AutoAttack cannot be activated inside towns or cities. Players may still configure settings while inside Prontera.
== AutoAttack Commands ==
Players can open the AutoAttack System using:
* <code>@autoattack</code>
* <code>@ac</code>
These commands provide access to the main AutoAttack menu after leaving the NPC location.
== Main AutoAttack Menu ==
The AutoAttack System menu includes:
* Turn ON AutoAttack
* Turn OFF AutoAttack
* Profiles — Save and Load
* Configuration
* Statistics and Reports
The menu also displays:
* Current AutoAttack status
* Account access type
* Remaining daily time for normal players
* Remaining VIP subscription time for VIP players
* Current session duration while AutoAttack is active
== AutoAttack Configuration ==
Players can configure several AutoAttack functions before beginning a session.
Available configuration categories include:
* Monster selection
* Attack skills
* Buff skills
* Buff items
* HP and SP potions
* Automatic healing
* Item pickup selection
* Priority item selection
* Teleport settings
* Regeneration settings
* Sit-to-rest settings
* Party request settings
* Behavior when AutoAttack ends
* Other supported combat settings
* Reset settings
Players should configure these options carefully according to the character’s job, build, equipment, available items, and hunting location.
== Profiles — Save and Load ==
The Profile system allows players to save AutoAttack configurations for later use.
Profiles are useful when a character has different settings for:
* Leveling
* Material farming
* Item farming
* Melee combat
* Ranged combat
* Physical skills
* Magical skills
* Different monster types
* Different hunting maps
Before activating AutoAttack, load the correct profile and review all settings.
== Monster Selection ==
Players can select the monsters that the character should target.
When configuring monsters:
# Travel to the intended hunting map.
# Open the AutoAttack System.
# Select '''Configuration'''.
# Open '''Monster Selection'''.
# Select the monsters that the character should attack.
# Save the configuration.
# Turn on AutoAttack.
Monster selection cannot be performed properly inside towns because the system scans monsters available on the character’s current map.
== Item Pickup Configuration ==
The AutoAttack System includes item pickup settings.
Players can configure:
* Items that should be collected
* Priority items
* Items that should be ignored
* Farming-related item preferences
Check the inventory and weight regularly. AutoAttack may become less effective if the character becomes overweight or runs out of inventory space.
== Skills and Consumables ==
Players can configure supported attack skills, buff skills, buff items, and recovery consumables.
Before starting AutoAttack:
* Prepare sufficient HP recovery items
* Prepare sufficient SP recovery items
* Confirm that required skill catalysts are available
* Prepare ammunition when required
* Confirm that the selected skills are learned
* Check that skill levels are configured correctly
* Confirm that equipped weapons support the selected skills
* Keep enough inventory space for collected items
== Teleport and Recovery Options ==
The AutoAttack System may be configured to use supported movement and recovery options, including:
* Teleport
* Fly Wings
* Teleporting based on minimum HP
* Teleporting when no monsters are found
* Reactions to MVP or Mini Boss monsters
* Sitting to recover HP and SP
* Returning to the save point when AutoAttack ends
Make sure the character has the required items and skills before enabling these functions.
== Restricted Maps ==
AutoAttack cannot be activated on the following types of maps:
* Towns and cities
* PvP maps
* War of Emperium or GvG maps
* Battleground maps
If an active AutoAttack character enters a restricted map, AutoAttack will be disabled automatically. Configuration remains available even when activation is restricted.
== Statistics and Reports ==
The AutoAttack System provides session statistics and reports. Players can use this section to review supported information about the current AutoAttack session, including collected items and session activity. A new session may clear previous session statistics and item logs before recording new results.
== Daily Time Calculation ==
For normal players, AutoAttack usage is counted only while AutoAttack is active.
When AutoAttack is turned off:
* The completed session time is recorded
* Remaining daily time is preserved
* Players may continue later using the remaining allowance
When the full 2-hour daily limit is reached, AutoAttack stops automatically and becomes available again after the daily reset.
== Logging Out During AutoAttack ==
When a normal player logs out while AutoAttack is active:
* The completed session time is added to the daily usage
* AutoAttack is stopped
* The remaining daily allowance is preserved
VIP players retain unlimited eligibility while the VIP subscription remains active, but AutoAttack must be started again after returning to the game.
== Recommended Setup Procedure ==
Before beginning an AutoAttack session:
# Select a suitable hunting map.
# Prepare the character’s equipment.
# Prepare HP and SP recovery items.
# Prepare ammunition or skill catalysts when required.
# Configure the target monsters.
# Configure attack and buff skills.
# Configure item pickup preferences.
# Configure recovery and teleport settings.
# Save the settings to a profile.
# Confirm that the map is not restricted.
# Activate AutoAttack.
# Monitor the character periodically.
== Important Information ==
* The AutoAttack System NPC is located at <code>prontera, 147, 162</code>.
* Normal players receive 2 hours of AutoAttack access each day.
* The normal player allowance resets every calendar day.
* Remaining normal-player time is preserved when AutoAttack is turned off.
* Normal daily time cannot exceed 2 hours.
* GladiusRO VIP players receive unlimited access while VIP is active.
* AutoAttack cannot be activated inside towns or cities.
* AutoAttack cannot be used on PvP, WoE, GvG, or Battleground maps.
* Entering a restricted map automatically disables AutoAttack.
* Players can configure AutoAttack while inside Prontera.
* Players can use <code>@autoattack</code> or <code>@ac</code> to open the system.
* Profiles can be saved and loaded.
* Players should monitor inventory weight and consumable supplies.
* AutoAttack settings should be reviewed before every farming session.
== Frequently Asked Questions ==
=== Where is the AutoAttack System NPC? ===
The AutoAttack System NPC is located in Prontera at:
'''<code>prontera, 147, 162</code>'''
=== How much AutoAttack time do normal players receive? ===
The daily allowance resets automatically every calendar day.
= GladiusRO Investment (NPC) =
=== Is the 2-hour limit counted continuously? ===
The '''GladiusRO Investment NPC''', also known as the '''Commodity Trader''', allows players to trade Bronze, Silver, and Gold Coin Bags through the GladiusRO investment system.
No. Time is counted while AutoAttack is active.
Players can open investment positions, review active positions, and claim positions that have reached maturity.
Players can turn off AutoAttack and use the remaining time later during the same day.
== NPC Location ==
=== Does unused AutoAttack time carry over? ===
No. The normal daily allowance resets to 2 hours on the next calendar day. Unused time does not accumulate.
=== How much AutoAttack time do VIP players receive? ===
GladiusRO VIP players receive unlimited AutoAttack access for as long as the VIP subscription remains active.
* '''Coordinates:''' <code>137, 27</code>
=== What happens when GladiusRO VIP expires? ===
When VIP is no longer active, the account returns to the normal AutoAttack access rules and daily limit.
== Supported Coin Bags ==
=== Can AutoAttack be turned on in Prontera? ===
The investment system supports the following Coin Bags:
No. Prontera is a town map, so AutoAttack activation is blocked.
* '''Bag of Bronze Coins'''
Players can still access the NPC and configure AutoAttack settings in Prontera before travelling to an eligible hunting map.
* '''Bag of Silver Coins'''
=== Can AutoAttack be used in the Mining Area? ===
AutoAttack cannot be activated if the Mining Area has an active PvP map flag. The system blocks AutoAttack on all PvP maps.
* '''Bag of Gold Coins'''
=== Can AutoAttack be used during WoE? ===
No. AutoAttack is blocked on WoE and GvG maps.
The NPC dialogue also displays the number of each Coin Bag currently available in the player's inventory.
=== Can AutoAttack be used in Battlegrounds? ===
No. AutoAttack is blocked on Battleground maps.
== How to Use the Investment NPC ==
=== What happens when the normal daily time reaches zero? ===
AutoAttack stops automatically. The player must wait for the next daily reset or obtain active GladiusRO VIP access for unlimited usage.
# Visit the '''GladiusRO Investment NPC''' at <code>prt_in, 137, 27</code>.
=== Can normal players extend the 2-hour daily limit? ===
# Speak to the NPC.
No. The normal-player allowance is fixed at 2 hours per day. Battery items or similar time additions cannot extend usage beyond that daily limit.
# Select '''How It Works''' to read the investment rules and requirements.
= '''GladiusRO Exchanger (NPC)''' =
# Select '''Trade Bronze''', '''Trade Silver''', or '''Trade Gold'''.
[[File:GladiusRO Exchanger.png|thumb|location: prt_in,133,38]]The '''GladiusRO Exchanger''' allows players to convert '''Bags of Coins into Zeny''' or exchange '''Zeny into Bags of Coins'''. Bags of Coins are used for various GladiusRO features, including '''Costume Enchantment''', '''GladiusRO Investment''', '''GladiusRO Lottery''', '''Kachua Keys''', and many more.
# Follow the instructions displayed by the NPC to open an investment position.
# Use '''View Open Positions''' to monitor active positions.
The '''GladiusRO Investment NPC''', also known as the '''Commodity Trader''', allows players to trade Bronze, Silver, and Gold Coin Bags through the GladiusRO investment system.
Players can open investment positions, review active positions, and claim positions that have reached maturity.
# Visit the '''GladiusRO Exchanger''' at <code>prt_in, 133, 38</code>.
# Speak to the NPC.
# Select one of the available options:
#* '''Exchange Bags of Coins to Zeny'''
#* '''Exchange Zeny to Bags of Coins'''
# Select the type of Coin Bag that you want to exchange.
# Enter the desired quantity.
# Confirm the exchange.
== Available Coin Bags ==
* '''Coordinates:''' <code>154, 187</code>
* '''Bag of Bronze Coins:''' <code>1,000,000 Zeny</code>
* '''Bag of Silver Coins:''' <code>20,000,000 Zeny</code>
* '''Bag of Gold Coins:''' <code>250,000,000 Zeny</code>
== Supported Coin Bags ==
== Important Information ==
The investment system supports the following Coin Bags:
* '''Bag of Bronze Coins'''
* Make sure the character has sufficient '''inventory space''' and '''weight capacity''' before exchanging Zeny for Bags of Coins.
* Make sure the character has enough Zeny to complete the exchange.
* When exchanging Bags of Coins into Zeny, the transaction cannot cause the character to exceed the maximum Zeny limit.
* Always check the selected Coin Bag and quantity before completing the exchange.
= '''Pet Merchant (NPC)''' =
[[File:Location- prt in, 165,150.png|thumb|Location: prt_mk, 165,150]]The '''Pet Merchant''' allows players to purchase a wide selection of '''Renewal Pet Eggs''' conveniently from one NPC. The shop contains '''105 unique Pet Eggs''', divided into five shop pages for easier browsing. Every Pet Egg is sold at a fixed price of '''5,000,000 Zeny'''.
* '''Bag of Silver Coins'''
== NPC Location ==
* '''Bag of Gold Coins'''
* '''Map:''' <code>prt_mk</code>
* '''Coordinates:''' <code>165, 150</code>
* '''NPC Name:''' Pet Merchant
The NPC dialogue also displays the number of each Coin Bag currently available in the player's inventory.
== Benefits ==
== How to Use the Investment NPC ==
* Provides convenient access to '''105 different Pet Eggs'''.
* No need to hunt monsters or search multiple locations for available eggs.
* All eggs have the same fixed price of '''5,000,000 Zeny'''.
* Eggs are separated into '''five shop pages''', making them easier to browse.
* Helps players collect pets and choose companions that may provide unique bonuses when properly cared for and equipped with the appropriate pet accessory.
# Visit the '''GladiusRO Investment NPC''' at <code>prt_in, 154, 187</code>.
== How to Purchase ==
# Visit the '''Pet Merchant''' at <code>prt_mk 165,150</code>.
# Speak to the NPC.
# Speak to the NPC.
# Select '''How It Works''' to read the investment rules and requirements.
# Select one of the five '''Pet Egg''' shop pages.
# Select '''Trade Bronze''', '''Trade Silver''', or '''Trade Gold'''.
# Choose your preferred Pet Egg.
# Follow the instructions displayed by the NPC to open an investment position.
# Complete the purchase using '''Zeny'''.
# Use '''View Open Positions''' to monitor active positions.
= '''Pet Supply Merchant (NPC)''' =
# When a position has reached maturity, select '''Claim Matured Positions'''.
[[File:Location- prt mk 165,150.png|thumb|Location: prt_mk 167,150]]The '''Pet Supply Merchant''' is a convenient one-stop NPC that provides essential items for raising and caring for pets. Players can purchase '''Pet Food''', '''Pet Accessories''', and '''Pet Incubators''' from a single merchant.
== NPC Options ==
== NPC Location ==
* '''Map:''' <code>prt_mk</code>
* '''Coordinates:''' <code>167, 150</code>
* '''NPC Name:''' Pet Supply Merchant
* '''Trade Bronze''' — Open a trade using Bronze Coin Bags.
== Available Supplies ==
* '''Trade Silver''' — Open a trade using Silver Coin Bags.
* '''53 Pet Food items''', divided into three shop pages.
* '''41 Pet Accessories''', divided into two shop pages.
* '''Pet Incubators''' for hatching Pet Eggs.
* '''Trade Gold''' — Open a trade using Gold Coin Bags.
== Prices ==
* '''View Open Positions''' — Review investment positions that are currently active.
* '''Pet Food:''' 10,000 Zeny each
* '''Pet Accessories:''' 1,000,000 Zeny each
* '''Pet Incubator:''' 100,000 Zeny each
* '''Claim Matured Positions''' — Claim positions that have completed their investment period.
== Benefits ==
* '''How It Works''' — View the in-game explanation and rules for the investment system.
* Purchase all essential pet supplies from '''one convenient NPC'''.
* Easily find suitable food to feed and care for different pets.
* Purchase accessories that may unlock or activate a pet’s available bonuses.
* Purchase Pet Incubators to hatch Pet Eggs.
* Supplies are organized into separate shop pages for easier browsing.
* Saves time by removing the need to search for pet supplies in multiple locations.
* '''Close''' — Exit the NPC dialogue.
== How to Use ==
'''Important:''' Read the '''How It Works''' section before opening an investment position. Review the trade requirements, maturity period, possible returns, and applicable risks carefully.
# Visit the '''Pet Supply Merchant''' at <code>prt_mk 167,150</code>.
# Speak to the NPC.
# Select the required category:
#* Pet Food
#* Pet Accessories
#* Pet Incubator
# Select the appropriate shop page.
# Choose the required item and complete the purchase using Zeny.
<blockquote>'''Tip:''' Keep enough Pet Food available to care for your pet. Check which food and accessory are suitable for the selected pet before purchasing</blockquote>
= Warper Mining Area (NPC) =
= '''Gengster Cat Costume (NPC)''' =
The '''Warper NPC''' provides quick access to the GladiusRO '''Mining Area''', along with other important locations such as towns, fields, dungeons, guild castles, instances, and special areas.
The '''Gengster Cat Costume''' NPC is a special costume merchant where players can browse and exchange coupons for a wide variety of costume items. Costumes are organized into multiple collections, making it easier to preview and find a preferred appearance.
== NPC Location ==
== NPC Location ==
* '''Map:''' Prontera (<code>prontera</code>)
* '''NPC Name:''' Gengster Cat Costume
* '''Map:''' <code>prontera</code>
* '''Coordinates:''' <code>164, 170</code>
== Costume Requirement ==
Every costume requires:
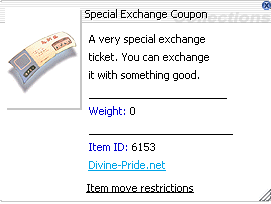
* '''Special Exchange Coupon (''can buy at cash shop or exchange your cash point with Special Exchange Coupon'')'''
* '''Item ID:''' <code>6153</code>
* '''Cost:''' 1 Special Exchange Coupon per costume
The NPC also displays the number of Special Exchange Coupons currently available in the player's inventory.
== Benefits ==
* Browse a large selection of costume items from one NPC.
* [[File:Item id 6153.png|thumb|Item id: 6153 Special Exchange Coupon]]Costumes are divided into multiple collections for easier browsing.
* Preview supported costume items through the normal shop interface.
* Exchange only '''1 Special Exchange Coupon''' for each costume.
* Purchase multiple costumes in one transaction when enough coupons are available.
* Customize character appearance without spending Zeny at this NPC.
* Additional costumes are available through the '''Extra Collection''' and '''Extra Collection 2''' categories.
* '''Coordinates:''' <code>155, 183</code>
== How to Purchase ==
== How to Enter the Mining Area ==
# Visit the '''Gengster Cat Costume''' NPC at <code>prontera 164,170</code>.
# Speak to the NPC.
# Select a costume collection.
# Browse and select the preferred costume.
# Make sure there is enough inventory weight capacity.
# Complete the exchange using '''1 Special Exchange Coupon per costume'''.
# Visit the '''Warper NPC''' at <code>prontera, 155, 183</code>.
<blockquote>'''Tip:''' Bring enough Special Exchange Coupons before visiting the NPC. If purchasing several costumes at once, one coupon is required for every costume selected.</blockquote>
# Speak to the Warper.
= '''1st–4th Job Equipment NPCs''' =
# Select '''Mining Area''' from the destination menu.
[[File:GladiusRO 1st to 4th equip NPC.png|alt=Location: prt_mk 162,121 (1st job to 4th job equipment NPC)|thumb|Location: prt_mk 162,121 (1st job to 4th job equipment NPC)]]The '''Job Equipment NPCs''' provide weapons, armor, accessories, and other equipment for characters progressing from '''1st Job through 4th Job'''. All equipment merchants are grouped along the area indicated by the '''yellow arrows''' in the picture, making it easier for players to browse equipment for different jobs and equipment types.
# Choose the available mining destination.
# Confirm the selection to be transported to the Mining Area.
== Warper Menu ==
== NPC Location ==
The Warper NPC also provides access to the following destination categories:
* '''Last Warp''' — Return to the most recently selected destination.
* '''Map:''' <code>prt_mk</code> — Prontera Market Street
* '''General area:''' Along both sides of the central southern pathway
* '''Map position shown in picture:''' Near <code>prt_mk 162,121</code>
* '''Directions:''' Follow the yellow arrows south from the center of the map.
* '''Towns''' — Travel to available towns.
The equipment NPCs are positioned in rows on both sides of the pathway. Players should walk along the marked route and speak to the appropriate NPC for the required job level and equipment category.
* '''Fields''' — Travel to available field maps.
== Purchase Requirements ==
* '''Dungeons''' — Travel to available dungeons.
==== 1st and 2nd Job Equipment ====
Equipment for '''1st Job''' and '''2nd Job''' characters can be purchased using '''Zeny'''.
* '''Guild Castles''' — Travel to guild castle areas.
==== 3rd and 4th Job Equipment ====
Equipment for '''3rd Job''' and '''4th Job''' characters requires:
* '''Mining Area''' — Travel to the GladiusRO mining location.
* '''Zeny'''
* '''Etel Dust'''
* '''HD Etel Bradium'''
* '''HD Etel Carnium'''
* '''Brown Diamond'''
* '''Instances''' — Access available instance locations.
The required materials can be obtained inside the '''Mining Area ('''You can go to Warper NPC, then select Mining Area, then choose any map to start mining). The exact Zeny price and material quantity depend on the equipment’s type and tier. More advanced equipment requires more Zeny and mining materials.
* '''Special Areas''' — Access special GladiusRO locations.
== Available Equipment ==
The merchants provide numerous equipment categories, including:
'''Tip:''' Make sure to prepare the required mining equipment and check your available inventory space before entering the Mining Area.
Each equipment category may have its own NPC. Players should check the NPC names and shop contents to find suitable equipment for their character.
= Donation Redeemer (NPC) =
The '''Donation Redeemer NPC''' allows players to convert their GladiusRO donation credits into the corresponding in-game rewards.
Donations help support GladiusRO's monthly server hosting, maintenance, development, and operating expenses.
== Benefits ==
== NPC Location ==
* Provides a clear equipment progression path from '''1st Job to 4th Job'''.
* Gives players convenient access to job-specific weapons and equipment.
* All equipment NPCs are grouped in the same area for easier navigation.
* Early-game equipment can be purchased directly using Zeny.
* Advanced equipment can be obtained by collecting materials from the Mining Area.
* Supports character progression into more advanced jobs and higher equipment tiers.
* Offers equipment for many weapon types, armor slots, and character builds.
* Rewards players for participating in mining and gathering activities.
== How to Purchase Equipment ==
* '''NPC Name:''' Donation Redeemer
# Travel to '''Prontera Market Street''' at <code>prt_mk</code>.
# Go to the location indicated by the yellow arrows.
# Find the NPC that sells the required equipment category.
# For '''1st or 2nd Job equipment''', prepare enough Zeny.
# For '''3rd or 4th Job equipment''', prepare the required Zeny and mining materials.
# Speak to the NPC and check the exact requirement before completing the purchase.
* '''Map:''' Prontera (<code>prontera</code>)
<blockquote>'''Tip:''' Visit the Mining Area before shopping for 3rd or 4th Job equipment. Collect '''Etel Dust, HD Etel Bradium, HD Etel Carnium, and Brown Diamond''', as stronger equipment requires larger quantities of these materials.</blockquote>
= '''Paid Max Job Master (NPC)''' =
[[File:Location- prontera,162,178.png|thumb|Location: prontera 162,178]]The service '''bypasses normal job-change quests''', intermediate class progression, and level requirements. A successful transaction sets the character to '''Base Level 275 and Job Level 60''' for a cost of '''500 Cash Points'''.The NPC supports Novice, first jobs, second jobs, transcendent jobs, third jobs, Super Novice, expanded classes, and Doram Summoner progression. Existing learned skills and unused skill points are retained.
* '''Coordinates:''' <code>161, 187</code>
=== Human first jobs ===
The available selection follows the current first-job branch:
Swordman -> Dragon Knight or Imperial Guard
== How to Redeem ==
Mage -> Arch Mage or Elemental Master
# Complete a donation through the official GladiusRO donation platform.
Archer -> Windhawk or Troubadour/Trouvere
# Log in to the game using the character that will receive the rewards.
# Visit the '''Donation Redeemer NPC''' at <code>prontera, 161, 187</code>.
# Speak to the Donation Redeemer NPC.
# Select '''Yes, convert them!'''
# Follow the instructions displayed by the NPC.
# Check the character's inventory after completing the redemption.
== NPC Options ==
Acolyte -> Cardinal or Inquisitor
* '''Yes, convert them!''' — Convert available GladiusRO donation credits into the applicable in-game rewards.
Merchant -> Meister or Biolo
* '''No, thanks.''' — Cancel the redemption process and close the dialogue.
Thief -> Shadow Cross or Abyss Chaser
== Important Information ==
=== Human second and third jobs ===
The NPC automatically chooses the matching final class:
Knight -> Dragon Knight
* Use only the official GladiusRO donation platform.
Crusader -> Imperial Guard
* Make sure the correct character is selected before redeeming.
Wizard -> Arch Mage
* Ensure that the character has sufficient inventory space.
Sage -> Elemental Master
* Never share account passwords or security information with anyone.
Hunter -> Windhawk
* If a completed donation is not available for redemption, contact GladiusRO staff and provide the relevant transaction details.
Bard -> Troubadour
'''Note:''' Donation conversion rates, requirements, and available rewards may be updated. Please refer to the official GladiusRO website and announcements for the latest information.
The '''Hunting Missions NPC''' allows players to receive a randomly assigned hunting quest.
Several difficulty levels are available. More challenging missions provide better rewards, so players should choose a difficulty that matches the character's current equipment and combat capability.
Monk -> Inquisitor
== NPC Location ==
Blacksmith -> Meister
* '''NPC Name:''' Hunting Missions
Alchemist -> Biolo
* '''Map:''' Prontera (<code>prontera</code>)
Assassin -> Shadow Cross
* '''Coordinates:''' <code>147, 168</code>
Rogue -> Abyss Chaser
== How Hunting Missions Work ==
=== '''Expanded and Doram classes''' ===
The Hunting Missions NPC assigns a random hunting quest based on the selected difficulty.
Super Novice -> Hyper Novice
Players must hunt the assigned monsters and complete the required number of kills. More difficult missions may involve stronger monsters, but the available rewards increase according to the mission difficulty.
Expanded Super Novice -> Hyper Novice
== How to Start a Hunting Mission ==
Gunslinger -> Night Watch
# Visit the '''Hunting Missions NPC''' at <code>prontera, 147, 168</code>.
Rebellion -> Night Watch
# Speak to the NPC.
# Choose a suitable mission difficulty.
# Review the assigned monster and required number of kills.
# Hunt the specified monsters until the mission is complete.
# Return to the '''Hunting Missions NPC''' to complete the mission and collect the available reward.
== Important Information ==
Ninja/Kagerou -> Shinkiro
* Hunting missions are assigned randomly.
Ninja/Oboro -> Shiranui
* Several mission difficulties are available.
Taekwon -> Sky Emperor or Soul Ascetic
* Rewards increase according to the selected difficulty.
Star Gladiator -> Sky Emperor
* Check the assigned target and required number of kills before leaving.
Star Emperor -> Sky Emperor
* Choose a difficulty suitable for the character's current level and equipment.
Soul Linker -> Soul Ascetic
* Prepare sufficient recovery items and supplies before attempting a difficult mission.
Soul Reaper -> Soul Ascetic
'''Tip:''' Higher-difficulty hunting missions offer better rewards, but the assigned monsters may be more challenging. Prepare suitable equipment, recovery items, and supplies before accepting a difficult mission.
Doram Summoner -> Spirit Handler
Latest revision as of 04:45, 24 October 2026
GladiusRO features a collection of exclusively developed Custom NPCs designed to enhance convenience, progression, rewards, and the overall gameplay experience. Each Custom NPC provides a unique service or feature, including access to special areas, server activities, investment systems, lotteries, VIP services, mining content, mission systems, reward redemption, and other custom functions. Use the sections below to learn where each NPC is located, how each system works, the requirements involved, and the rewards or services available.
The Market Entrance Warper provides quick access to the GladiusRO Market, the main trading centre where players can buy and sell a wide variety of items.
Inside the market, players can:
Browse shops selling weapons, armour, accessories, and other equipment.
Purchase pet eggs, pet accessories, taming items, and other pet-related supplies.
Find consumables, materials, rare items, and miscellaneous goods.
Open their own Vending Shop to sell items directly to other players.
Players who wish to sell items may enter through the Market Entrance Warper, choose a suitable vending location inside the market, and open a shop using the game’s vending system. Prices are determined by individual sellers, so buyers are encouraged to compare different shops before purchasing.
Whether purchasing new equipment, searching for pet supplies, selling valuable items, or looking for rare goods, the GladiusRO Market is the primary destination for player-to-player trading. Speak to the Market Entrance Warper to enter the market and start shopping or vending.
NPC Location
Map: Prontera Interior (prt_in)
Coordinates:135, 31
How to Enter the Market
Visit the Market Entrance Warper at prt_in, 135, 31.
Speak to the NPC.
Select Enter the Market.
The NPC will teleport your character directly to the Market.
GladiusRO Lottery (NPC)
location: prt_in,130,39
The GladiusRO Lottery is a coin-bag lottery system where players can purchase tickets for a chance to win prizes contributed by participating players.
NPC Location
Map: Prontera Interior (prt_in)
Coordinates:130, 39
Lottery Information
Each player may purchase up to 10 tickets per lottery round.
Players choose a lucky number from 1 to 9,999.
Winner will be automatic selected by system up to 5 number
The automatic lottery draw takes place at 21:00 server time (GMT+8) every day.
Each ticket may require between 1 and 100 Bronze, Silver, or Gold Coin Bags.
How to Participate
Visit the GladiusRO Lottery NPC at prt_in, 130, 39.
Speak to the NPC and select Buy Ticket.
Choose the number of tickets to purchase.
Select your preferred lucky number from 0001 to 9999.
Complete the purchase using the required Coin Bags.
Return after the daily draw to check the result.
NPC Options
Buy Ticket — Purchase a lottery ticket and choose a lucky number.
View My Tickets — Review tickets purchased for the current lottery round.
Top 20 Purchasers — View the players who purchased the most tickets.
Top 20 Winners — View the leading lottery winners.
Check Results / Claim — Check the latest result and claim an eligible prize.
Check Bag Returns — Check whether any Coin Bags are available to be returned.
View Winner Prizes — View the available prizes.
Important: Make sure to check the lottery result and claim any available prize after the daily draw.
AutoAttack System (NPC)
location: prontera,147,162
The AutoAttack System NPC allows players to configure automated combat, item collection, recovery, skills, teleportation, and other supported farming settings. Normal players receive 2 hours of AutoAttack access per day. The daily allowance resets automatically each calendar day. Players with an active GladiusRO VIP subscription receive unlimited AutoAttack access for as long as the VIP subscription remains active.
NPC Location
NPC Name: AutoAttack System
Map: Prontera (prontera)
Coordinates:147, 162
Service: AutoAttack activation and configuration
Access Duration
Normal Players
Normal players receive:
2 hours of AutoAttack access per day
Remaining time is saved when AutoAttack is turned off
Used time continues from the remaining daily allowance
The allowance resets automatically on the next calendar day
Unused time does not extend the following day
For example, if a player uses AutoAttack for 30 minutes, the account will have approximately 1 hour and 30 minutes remaining for that day.
GladiusRO VIP Players
Players with an active GladiusRO VIP subscription receive:
Unlimited AutoAttack access
Continuous access while VIP remains active
No normal 2-hour daily limitation
Access automatically returns to the normal daily limit when VIP expires
VIP access is available only while the GladiusRO VIP subscription is active.
How to Use the AutoAttack System
Visit the AutoAttack System NPC at prontera, 147, 162.
Speak to the NPC.
Open Configuration.
Configure the preferred monsters, skills, items, recovery options, and other settings.
Save the configuration to a profile if required.
Leave Prontera and travel to an eligible hunting map.
Open the AutoAttack System again using the supported command.
Select Turn ON AutoAttack.
Monitor the character and remaining AutoAttack time.
Select Turn OFF AutoAttack when the session is complete.
Although the NPC is located in Prontera, AutoAttack cannot be activated inside towns or cities. Players may still configure settings while inside Prontera.
AutoAttack Commands
Players can open the AutoAttack System using:
@autoattack
@ac
These commands provide access to the main AutoAttack menu after leaving the NPC location.
Main AutoAttack Menu
The AutoAttack System menu includes:
Turn ON AutoAttack
Turn OFF AutoAttack
Profiles — Save and Load
Configuration
Statistics and Reports
The menu also displays:
Current AutoAttack status
Account access type
Remaining daily time for normal players
Remaining VIP subscription time for VIP players
Current session duration while AutoAttack is active
AutoAttack Configuration
Players can configure several AutoAttack functions before beginning a session.
Available configuration categories include:
Monster selection
Attack skills
Buff skills
Buff items
HP and SP potions
Automatic healing
Item pickup selection
Priority item selection
Teleport settings
Regeneration settings
Sit-to-rest settings
Party request settings
Behavior when AutoAttack ends
Other supported combat settings
Reset settings
Players should configure these options carefully according to the character’s job, build, equipment, available items, and hunting location.
Profiles — Save and Load
The Profile system allows players to save AutoAttack configurations for later use.
Profiles are useful when a character has different settings for:
Leveling
Material farming
Item farming
Melee combat
Ranged combat
Physical skills
Magical skills
Different monster types
Different hunting maps
Before activating AutoAttack, load the correct profile and review all settings.
Monster Selection
Players can select the monsters that the character should target.
When configuring monsters:
Travel to the intended hunting map.
Open the AutoAttack System.
Select Configuration.
Open Monster Selection.
Select the monsters that the character should attack.
Save the configuration.
Turn on AutoAttack.
Monster selection cannot be performed properly inside towns because the system scans monsters available on the character’s current map.
Item Pickup Configuration
The AutoAttack System includes item pickup settings.
Players can configure:
Items that should be collected
Priority items
Items that should be ignored
Farming-related item preferences
Check the inventory and weight regularly. AutoAttack may become less effective if the character becomes overweight or runs out of inventory space.
Skills and Consumables
Players can configure supported attack skills, buff skills, buff items, and recovery consumables.
Before starting AutoAttack:
Prepare sufficient HP recovery items
Prepare sufficient SP recovery items
Confirm that required skill catalysts are available
Prepare ammunition when required
Confirm that the selected skills are learned
Check that skill levels are configured correctly
Confirm that equipped weapons support the selected skills
Keep enough inventory space for collected items
Teleport and Recovery Options
The AutoAttack System may be configured to use supported movement and recovery options, including:
Teleport
Fly Wings
Teleporting based on minimum HP
Teleporting when no monsters are found
Reactions to MVP or Mini Boss monsters
Sitting to recover HP and SP
Returning to the save point when AutoAttack ends
Make sure the character has the required items and skills before enabling these functions.
Restricted Maps
AutoAttack cannot be activated on the following types of maps:
Towns and cities
PvP maps
War of Emperium or GvG maps
Battleground maps
If an active AutoAttack character enters a restricted map, AutoAttack will be disabled automatically. Configuration remains available even when activation is restricted.
Statistics and Reports
The AutoAttack System provides session statistics and reports. Players can use this section to review supported information about the current AutoAttack session, including collected items and session activity. A new session may clear previous session statistics and item logs before recording new results.
Daily Time Calculation
For normal players, AutoAttack usage is counted only while AutoAttack is active.
When AutoAttack is turned off:
The completed session time is recorded
Remaining daily time is preserved
Players may continue later using the remaining allowance
When the full 2-hour daily limit is reached, AutoAttack stops automatically and becomes available again after the daily reset.
Logging Out During AutoAttack
When a normal player logs out while AutoAttack is active:
The completed session time is added to the daily usage
AutoAttack is stopped
The remaining daily allowance is preserved
VIP players retain unlimited eligibility while the VIP subscription remains active, but AutoAttack must be started again after returning to the game.
Recommended Setup Procedure
Before beginning an AutoAttack session:
Select a suitable hunting map.
Prepare the character’s equipment.
Prepare HP and SP recovery items.
Prepare ammunition or skill catalysts when required.
Configure the target monsters.
Configure attack and buff skills.
Configure item pickup preferences.
Configure recovery and teleport settings.
Save the settings to a profile.
Confirm that the map is not restricted.
Activate AutoAttack.
Monitor the character periodically.
Important Information
The AutoAttack System NPC is located at prontera, 147, 162.
Normal players receive 2 hours of AutoAttack access each day.
The normal player allowance resets every calendar day.
Remaining normal-player time is preserved when AutoAttack is turned off.
Normal daily time cannot exceed 2 hours.
GladiusRO VIP players receive unlimited access while VIP is active.
AutoAttack cannot be activated inside towns or cities.
AutoAttack cannot be used on PvP, WoE, GvG, or Battleground maps.
Entering a restricted map automatically disables AutoAttack.
Players can configure AutoAttack while inside Prontera.
Players can use @autoattack or @ac to open the system.
Profiles can be saved and loaded.
Players should monitor inventory weight and consumable supplies.
AutoAttack settings should be reviewed before every farming session.
Frequently Asked Questions
Where is the AutoAttack System NPC?
The AutoAttack System NPC is located in Prontera at:
prontera, 147, 162
How much AutoAttack time do normal players receive?
Normal players receive 2 hours per day.
The daily allowance resets automatically every calendar day.
Is the 2-hour limit counted continuously?
No. Time is counted while AutoAttack is active.
Players can turn off AutoAttack and use the remaining time later during the same day.
Does unused AutoAttack time carry over?
No. The normal daily allowance resets to 2 hours on the next calendar day. Unused time does not accumulate.
How much AutoAttack time do VIP players receive?
GladiusRO VIP players receive unlimited AutoAttack access for as long as the VIP subscription remains active.
What happens when GladiusRO VIP expires?
When VIP is no longer active, the account returns to the normal AutoAttack access rules and daily limit.
Can AutoAttack be turned on in Prontera?
No. Prontera is a town map, so AutoAttack activation is blocked.
Players can still access the NPC and configure AutoAttack settings in Prontera before travelling to an eligible hunting map.
Can AutoAttack be used in the Mining Area?
AutoAttack cannot be activated if the Mining Area has an active PvP map flag. The system blocks AutoAttack on all PvP maps.
Can AutoAttack be used during WoE?
No. AutoAttack is blocked on WoE and GvG maps.
Can AutoAttack be used in Battlegrounds?
No. AutoAttack is blocked on Battleground maps.
What happens when the normal daily time reaches zero?
AutoAttack stops automatically. The player must wait for the next daily reset or obtain active GladiusRO VIP access for unlimited usage.
Can normal players extend the 2-hour daily limit?
No. The normal-player allowance is fixed at 2 hours per day. Battery items or similar time additions cannot extend usage beyond that daily limit.
GladiusRO Exchanger (NPC)
location: prt_in,133,38
The GladiusRO Exchanger allows players to convert Bags of Coins into Zeny or exchange Zeny into Bags of Coins. Bags of Coins are used for various GladiusRO features, including Costume Enchantment, GladiusRO Investment, GladiusRO Lottery, Kachua Keys, and many more.
NPC Location
Map: Prontera Interior (prt_in)
Coordinates:133, 38
NPC Name: GladiusRO Exchanger
How to Exchange Currency
Visit the GladiusRO Exchanger at prt_in, 133, 38.
Speak to the NPC.
Select one of the available options:
Exchange Bags of Coins to Zeny
Exchange Zeny to Bags of Coins
Select the type of Coin Bag that you want to exchange.
Enter the desired quantity.
Confirm the exchange.
Available Coin Bags
Bag of Bronze Coins:1,000,000 Zeny
Bag of Silver Coins:20,000,000 Zeny
Bag of Gold Coins:250,000,000 Zeny
Important Information
Make sure the character has sufficient inventory space and weight capacity before exchanging Zeny for Bags of Coins.
Make sure the character has enough Zeny to complete the exchange.
When exchanging Bags of Coins into Zeny, the transaction cannot cause the character to exceed the maximum Zeny limit.
Always check the selected Coin Bag and quantity before completing the exchange.
Pet Merchant (NPC)
Location: prt_mk, 165,150
The Pet Merchant allows players to purchase a wide selection of Renewal Pet Eggs conveniently from one NPC. The shop contains 105 unique Pet Eggs, divided into five shop pages for easier browsing. Every Pet Egg is sold at a fixed price of 5,000,000 Zeny.
NPC Location
Map:prt_mk
Coordinates:165, 150
NPC Name: Pet Merchant
Benefits
Provides convenient access to 105 different Pet Eggs.
No need to hunt monsters or search multiple locations for available eggs.
All eggs have the same fixed price of 5,000,000 Zeny.
Eggs are separated into five shop pages, making them easier to browse.
Helps players collect pets and choose companions that may provide unique bonuses when properly cared for and equipped with the appropriate pet accessory.
How to Purchase
Visit the Pet Merchant at prt_mk 165,150.
Speak to the NPC.
Select one of the five Pet Egg shop pages.
Choose your preferred Pet Egg.
Complete the purchase using Zeny.
Pet Supply Merchant (NPC)
Location: prt_mk 167,150
The Pet Supply Merchant is a convenient one-stop NPC that provides essential items for raising and caring for pets. Players can purchase Pet Food, Pet Accessories, and Pet Incubators from a single merchant.
NPC Location
Map:prt_mk
Coordinates:167, 150
NPC Name: Pet Supply Merchant
Available Supplies
53 Pet Food items, divided into three shop pages.
41 Pet Accessories, divided into two shop pages.
Pet Incubators for hatching Pet Eggs.
Prices
Pet Food: 10,000 Zeny each
Pet Accessories: 1,000,000 Zeny each
Pet Incubator: 100,000 Zeny each
Benefits
Purchase all essential pet supplies from one convenient NPC.
Easily find suitable food to feed and care for different pets.
Purchase accessories that may unlock or activate a pet’s available bonuses.
Purchase Pet Incubators to hatch Pet Eggs.
Supplies are organized into separate shop pages for easier browsing.
Saves time by removing the need to search for pet supplies in multiple locations.
How to Use
Visit the Pet Supply Merchant at prt_mk 167,150.
Speak to the NPC.
Select the required category:
Pet Food
Pet Accessories
Pet Incubator
Select the appropriate shop page.
Choose the required item and complete the purchase using Zeny.
Tip: Keep enough Pet Food available to care for your pet. Check which food and accessory are suitable for the selected pet before purchasing
Gengster Cat Costume (NPC)
locaton: Prontera 164,170
The Gengster Cat Costume NPC is a special costume merchant where players can browse and exchange coupons for a wide variety of costume items. Costumes are organized into multiple collections, making it easier to preview and find a preferred appearance.
NPC Location
NPC Name: Gengster Cat Costume
Map:prontera
Coordinates:164, 170
Costume Requirement
Every costume requires:
Special Exchange Coupon (can buy at cash shop or exchange your cash point with Special Exchange Coupon)
Item ID:6153
Cost: 1 Special Exchange Coupon per costume
The NPC also displays the number of Special Exchange Coupons currently available in the player's inventory.
Benefits
Browse a large selection of costume items from one NPC.
Item id: 6153 Special Exchange CouponCostumes are divided into multiple collections for easier browsing.
Preview supported costume items through the normal shop interface.
Exchange only 1 Special Exchange Coupon for each costume.
Purchase multiple costumes in one transaction when enough coupons are available.
Customize character appearance without spending Zeny at this NPC.
Additional costumes are available through the Extra Collection and Extra Collection 2 categories.
How to Purchase
Visit the Gengster Cat Costume NPC at prontera 164,170.
Speak to the NPC.
Select a costume collection.
Browse and select the preferred costume.
Make sure there is enough inventory weight capacity.
Complete the exchange using 1 Special Exchange Coupon per costume.
Tip: Bring enough Special Exchange Coupons before visiting the NPC. If purchasing several costumes at once, one coupon is required for every costume selected.
1st–4th Job Equipment NPCs
Location: prt_mk 162,121 (1st job to 4th job equipment NPC)
The Job Equipment NPCs provide weapons, armor, accessories, and other equipment for characters progressing from 1st Job through 4th Job. All equipment merchants are grouped along the area indicated by the yellow arrows in the picture, making it easier for players to browse equipment for different jobs and equipment types.
NPC Location
Map:prt_mk — Prontera Market Street
General area: Along both sides of the central southern pathway
Map position shown in picture: Near prt_mk 162,121
Directions: Follow the yellow arrows south from the center of the map.
The equipment NPCs are positioned in rows on both sides of the pathway. Players should walk along the marked route and speak to the appropriate NPC for the required job level and equipment category.
Purchase Requirements
1st and 2nd Job Equipment
Equipment for 1st Job and 2nd Job characters can be purchased using Zeny.
3rd and 4th Job Equipment
Equipment for 3rd Job and 4th Job characters requires:
Zeny
Etel Dust
HD Etel Bradium
HD Etel Carnium
Brown Diamond
The required materials can be obtained inside the Mining Area (You can go to Warper NPC, then select Mining Area, then choose any map to start mining). The exact Zeny price and material quantity depend on the equipment’s type and tier. More advanced equipment requires more Zeny and mining materials.
Available Equipment
The merchants provide numerous equipment categories, including:
Weapons for different jobs and classes
Armor
Garments
Footgear
Accessories
Headgear
Shields
Shadow Equipment
Other job-specific equipment
Each equipment category may have its own NPC. Players should check the NPC names and shop contents to find suitable equipment for their character.
Benefits
Provides a clear equipment progression path from 1st Job to 4th Job.
Gives players convenient access to job-specific weapons and equipment.
All equipment NPCs are grouped in the same area for easier navigation.
Early-game equipment can be purchased directly using Zeny.
Advanced equipment can be obtained by collecting materials from the Mining Area.
Supports character progression into more advanced jobs and higher equipment tiers.
Offers equipment for many weapon types, armor slots, and character builds.
Rewards players for participating in mining and gathering activities.
How to Purchase Equipment
Travel to Prontera Market Street at prt_mk.
Go to the location indicated by the yellow arrows.
Find the NPC that sells the required equipment category.
For 1st or 2nd Job equipment, prepare enough Zeny.
For 3rd or 4th Job equipment, prepare the required Zeny and mining materials.
Speak to the NPC and check the exact requirement before completing the purchase.
Tip: Visit the Mining Area before shopping for 3rd or 4th Job equipment. Collect Etel Dust, HD Etel Bradium, HD Etel Carnium, and Brown Diamond, as stronger equipment requires larger quantities of these materials.
Paid Max Job Master (NPC)
Location: prontera 162,178
The service bypasses normal job-change quests, intermediate class progression, and level requirements. A successful transaction sets the character to Base Level 275 and Job Level 60 for a cost of 500 Cash Points.The NPC supports Novice, first jobs, second jobs, transcendent jobs, third jobs, Super Novice, expanded classes, and Doram Summoner progression. Existing learned skills and unused skill points are retained.
Human first jobs
The available selection follows the current first-job branch:
Swordman -> Dragon Knight or Imperial Guard
Mage -> Arch Mage or Elemental Master
Archer -> Windhawk or Troubadour/Trouvere
Acolyte -> Cardinal or Inquisitor
Merchant -> Meister or Biolo
Thief -> Shadow Cross or Abyss Chaser
Human second and third jobs
The NPC automatically chooses the matching final class: